문제 상황
테스트 코드를 작성할 때 Security에서 제공하는 @WithMockUser 어노테이션을 사용해서 인증 테스트를 수행했습니다. 하지만 Authentication의 getPrincipal() 메소드를 사용할 때 null이 반환되는 현상이 발생해서 테스트를 통과하지 못했습니다.
기존의 방식
@GetMapping("/mycomments")
public Response<Page<CommentResponse>> getMyComments(Authentication authentication, Pageable pageable) {
    String username = authentication.getName();

    Page<CommentResponse> response = postService.getMyComments(username, pageable).map(CommentResponse::fromComment);
    return Response.success(response);
}
authentication 클래스에서 getName()을 통해 서비스단에 유저의 이름을 전달하는 로직이었습니다.
테스트 코드
@Test
@WithMockUser(username = "username")
@DisplayName("내 댓글 조회 성공")
void 내_댓글_조회_성공() throws Exception {
    //Given
    String username = "username";

    //When
    when(postService.getMyComments(eq(username), any(Pageable.class))).thenReturn(Page.empty());

    //Then
    mvc.perform(get("/api/v1/post/mycomments"))
            .andExpect(status().isOk());
}
기존의 authentication.getName() 메소드를 사용할 때는 정상적으로 통과하는 것을 볼 수 있습니다.

변경된 코드
@GetMapping("/mycomments")
public Response<Page<CommentResponse>> getMyComments(Authentication authentication, Pageable pageable) {
    Member member = getSafeCastInstance(authentication);

    Page<CommentResponse> response = postService.getMyComments(member.getName(), pageable).map(CommentResponse::fromComment);
    return Response.success(response);
}
getSafeCastInstance 메소드에서 authentication.getPrincipal() 메소드를 이용해서 사용자 객체를 추출하는 방식으로 변경했습니다.
테스트 실패
테스트가 실패했습니다. 결과를 보면 Casting이 실패된 것을 볼 수 있습니다.

원인 분석
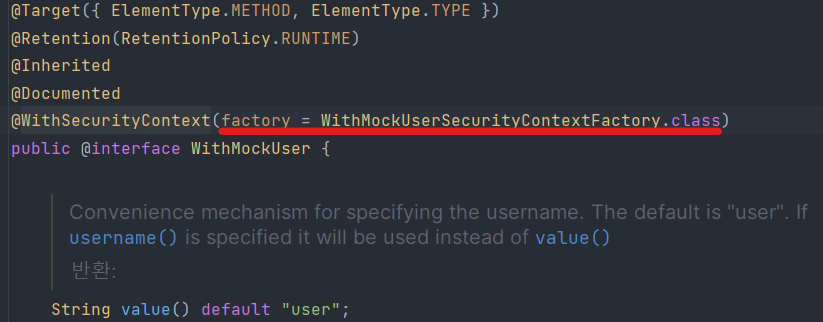
@WithMockUser 클래스 확인
이 클래스의 @WithSecurityContext를 통해 WithMockUserSecurityContextFactory.class 클래스를 이용해 인증 설정을 하는 것을 확인할 수 있습니다.
WithMockUserSecurityContextFactory.class 확인
final class WithMockUserSecurityContextFactory implements WithSecurityContextFactory<WithMockUser> {

    private SecurityContextHolderStrategy securityContextHolderStrategy = SecurityContextHolder
            .getContextHolderStrategy();

    @Override
    public SecurityContext createSecurityContext(WithMockUser withUser) {
        String username = StringUtils.hasLength(withUser.username()) ? withUser.username() : withUser.value();
        Assert.notNull(username, () -> withUser + " cannot have null username on both username and value properties");
        List<GrantedAuthority> grantedAuthorities = new ArrayList<>();
        for (String authority : withUser.authorities()) {
            grantedAuthorities.add(new SimpleGrantedAuthority(authority));
        }
        if (grantedAuthorities.isEmpty()) {
            for (String role : withUser.roles()) {
                Assert.isTrue(!role.startsWith("ROLE_"), () -> "roles cannot start with ROLE_ Got " + role);
                grantedAuthorities.add(new SimpleGrantedAuthority("ROLE_" + role));
            }
        }
        else if (!(withUser.roles().length == 1 && "USER".equals(withUser.roles()[0]))) {
            throw new IllegalStateException("You cannot define roles attribute " + Arrays.asList(withUser.roles())
                    + " with authorities attribute " + Arrays.asList(withUser.authorities()));
        }
        User principal = new User(username, withUser.password(), true, true, true, true, grantedAuthorities);
        Authentication authentication = UsernamePasswordAuthenticationToken.authenticated(principal,
                principal.getPassword(), principal.getAuthorities());
        SecurityContext context = this.securityContextHolderStrategy.createEmptyContext();
        context.setAuthentication(authentication);
        return context;
    }
}
대략적으로 확인해보면:
- 어노테이션에서 설정해주는 username, password, role 등 다양한 역할을 적용해 줍니다.
User객체에 설정해주는 인증 정보들을 넣어 줍니다.UsernamePasswordAuthenticationToken방식의 authentication에 객체, 비밀번호, 권한을 설정해줘 Authentication을 생성합니다.- Security 프레임워크에서 해당 객체를 인식할 수 있게
setAuthentication해줍니다.
문제점 발견
제가 사용하고 있는 객체 클래스는 Member.class이지만 @WithMockUser에서 사용하고 있는 클래스는 User.class였습니다.
해결 방법
User.class를 이용한 테스트가 아닌 Member.class를 이용한 테스트 어노테이션을 만들기로 했습니다.
WithCustomMember어노테이션 만들기WithCustomMember동작을 하는 Factory 생성하기WithCustomAnonymouse어노테이션 만들기WithCustomAnonymouse동작을 하는 Factory 생성하기
WithCustomMember 클래스
@Retention(RetentionPolicy.RUNTIME)
@WithSecurityContext(factory = WithMockCustomSecurityContextFactory.class)
public @interface WithMockCustomMember {
    String username = "username";
    String password = "password";
}
RetentionPolicy를 통해 실행 중에 이 어노테이션이 적용될 수 있게 설정해주었습니다. @WithSecurityContext에서는 제가 Custom으로 만든 Factory를 적용해 줄 겁니다.
WithMockCustomSecurityContextFactory 클래스
public class WithMockCustomSecurityContextFactory implements WithSecurityContextFactory<WithMockCustomMember> {

    @Override
    public SecurityContext createSecurityContext(WithMockCustomMember annotation) {
        SecurityContext context = SecurityContextHolder.createEmptyContext();
        Member member = Member.fromEntity(EntityFixture.of());
        UsernamePasswordAuthenticationToken usernamePasswordAuthenticationToken =
            new UsernamePasswordAuthenticationToken(member, null, member.getAuthorities());
        context.setAuthentication(usernamePasswordAuthenticationToken);

        return context;
    }
}
- 인증 검사를 하기 위한
SecurityContext를 생성합니다. - 인증 객체에 사용할
Member객체를 생성해 줍니다. UsernamePasswordAuthenticationToken방식으로 인증 정보를 생성해주고- context에 적용해줍니다.
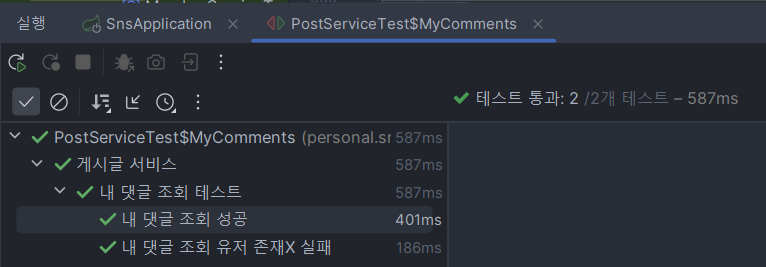
변경된 테스트 코드
@Test
@WithMockCustomMember
@DisplayName("내 댓글 조회 성공")
void 내_댓글_조회_성공() throws Exception {
    //Given
    String username = "username";

    //When
    when(postService.getMyComments(eq(username), any(Pageable.class))).thenReturn(Page.empty());

    //Then
    mvc.perform(get("/api/v1/post/mycomments"))
            .andExpect(status().isOk());
}
성공적으로 테스트 코드가 통과하는 것을 확인할 수 있습니다.

WithMockCustomAnonymouseSecurityContextFactory
public class WithMockCustomAnonymouseSecurityContextFactory implements WithSecurityContextFactory<WithCustomAnonymouse> {
    @Override
    public SecurityContext createSecurityContext(WithCustomAnonymouse annotation) {
        SecurityContext context = SecurityContextHolder.createEmptyContext();
        List<GrantedAuthority> authorities = AuthorityUtils.createAuthorityList("ROLE_ANONYMOUS");
        AnonymousAuthenticationToken anonymouseToken = new AnonymousAuthenticationToken("key", "anonymouse", authorities);
        context.setAuthentication(anonymouseToken);

        return context;
    }
}
AnonymousAuthenticationToken 객체를 이용해서 익명 인증 객체를 만들었습니다.
결론
@WithMockUser는 기본적으로 Spring Security의 User 클래스를 사용합니다. 커스텀 UserDetails 구현체를 사용하는 경우, 별도의 커스텀 어노테이션과 SecurityContextFactory를 만들어 사용해야 합니다.